The best way to personalize wood carvings is with Whittling pencils. This introductory guide shows how to make Uncle Sam, Santas, Leprechauns and Santas using a variety different tools. These pencils come with clear instructions and step-by-step photos, and the author includes tips on how to choose the proper micro-mini carving tools. He also gives tips on how to select the right pencils for you and provides basic information about painting and beards.
Dale Vander Linden
Dale Vander Linden (81) still makes pencils despite his years. He's been creating pencils for more than 60 year and was even a US Navy veteran during World War II. Vander Linden's wife, Cherry Vander Linden, his sons Stephen and JoAnne and brother Pete are all still with him. He was also preceded in death by his parents, Guy and Katie Vander Linden, and his brothers Ern, Don, and Keith.
Dale Vander Linden's whittling pencils
Dale Vander Linden frequently uses rolling pins or pencils to carve his Santa Claus. At 81 years old, he spends the days leading up to Christmas carving the Santa Claus from pencils and other materials. While it would be tempting to use a carver’s kit to carve Santa Claus's face, he prefers to use the rolling pin.
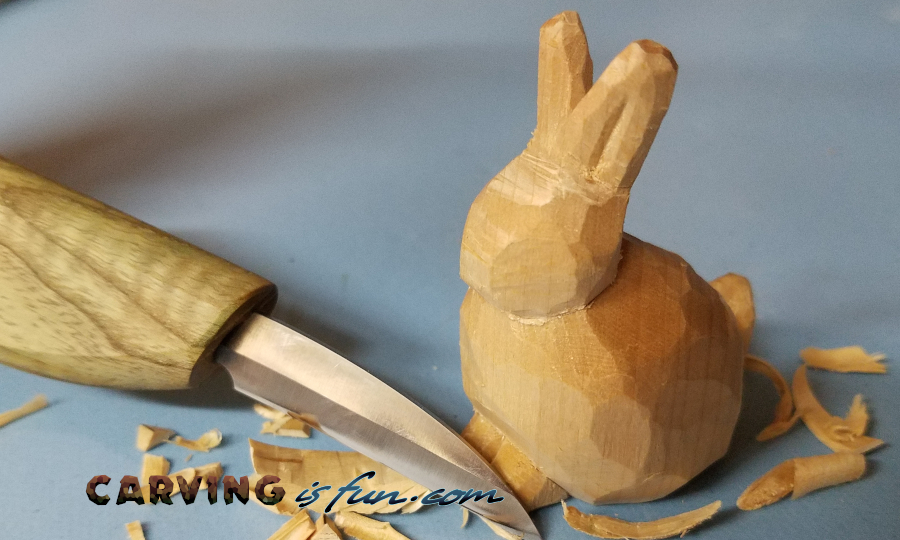
Wood carving techniques
There are many different wood carving techniques you can use when creating your unique pencils. Natural oils are a great way to finish your wood carvings. These oils help protect the wood from dirt and moisture, and give the wood a sheen which allows the viewer to easily read the form. Avoid gloss varnish. Gloss varnish creates a shiny finish that confuses the eye. Another option is wax. It gives pencils a soft, lustrous shine. This technique is most appropriate for indoor carvings.
It is important to choose the right wood type based on what kind of carving you want. A wood with little figure and fine grain is best for detailed carving. A strong figure may interfere with reading fine detail. Next, you will need to pick the right tools. Safety goggles and Kevlar safety gloves will be required. These will protect your hands from the wood chips and keep you from scratching it.
sanding the edges on whittling pencils

Wood carving is a popular form of decoration. This involves carving a plaque or tablet of wood. Sanding the edges can enhance the product's appearance. These pencils can be used for any purpose, no matter what. You must first sand these pencil edges to achieve a smooth, sharp surface.
Begin by creating divots within the graphite core. After you have done this, you can then use a number 2 pencil to make your marks. Make sure to use sandpaper that is lighter than the mark before you stop. You can apply hot melt glue to the pencil tip after carving.
FAQ
What tools do I need to start as a woodworker and what should I learn?
Woodworking takes practice and patience. Learning how to use the various tools and techniques necessary for woodworking takes patience.
There are many types of woodworking equipment on the market today. Some prefer power tools while some prefer hand tools.
You have the freedom to choose what tool you want, but it is important that you select the right tool for your job. It may be a good idea to start with a basic set, if possible, if you don’t know much about hand tools.
You might also want to learn how a router works, which allows you to cut wood into intricate shapes. These can be found at most hardware shops.
Where can I purchase hardwood lumber?
Home Depot offers hardwood lumber. They carry a variety of wood products such as flooring, cabinets, and furniture.
There is also a wide selection of engineered hardwoods, including Ipe (Araucaria Angustifolia), Brazilian Cherry(Pau d'Arco), Mahogany (Swietenia Mcrophylla).
You can search Google for hardwood lumber to find them online.
How do I determine what kind of wood my project is made from?
When purchasing wood, always check the label. It should have information about the wood species as well its moisture content and whether any preservatives were used.
How long does a piece take to finish?
It depends on which wood you choose, how complicated your design is and what amount of finishing you apply. Hardwoods, for example, require more maintenance than softwoods. Hardwoods also tend to be more expensive than softwoods. But they last longer and resist moisture better. The typical time taken to finish a piece furniture takes anywhere from one to three month.
What kind and type of wood should i use?
The most commonly used woods for woodworking are oak, maple, cherry. Each wood type has its own characteristics which affect the final product's appearance and feel. Oak, for example, tends be darker and more hard than other woods. Birch is soft and light, and mahogany is denseer and heavier. You can also choose from solid wood or veneers. Veneers can be described as thin sheets of wood that have been glued together in one layer.
How do I organize my shop?
A designated place to store your tools is the first step towards keeping your workshop clean. To keep your tools sharp and ready for work, keep them clean of dust and debris. Pegboard hooks can be used to hang tools and accessories.
What's the difference between plywood vs particle board?
Plywood is made of layers of wood that are pressed together under pressure. Plywood is available in a variety of thicknesses. It is often used to make cabinets or flooring. Particle board is made up of sawdust mixed in resin, then compressed into large pieces. It's commonly used for home improvement projects. Both types are sturdy and easy to cut.
Statistics
- In 2014, there were just over 237,000 jobs for all woodworkers, with other wood product manufacturing employing 23 percent; wood kitchen cabinets and countertop manufacturing employing 21 percent. (theartcareerproject.com)
- Most woodworkers agree that lumber moisture needs to be under 10% for building furniture. (woodandshop.com)
- Woodworkers on the lower end of that spectrum, the bottom 10% to be exact, make roughly $24,000 a year, while the top 10% makes $108,000. (zippia.com)
- If your lumber isn't as dry as you would like when you purchase it (over 22% in Glen Huey's opinion…probably over 10-15% in my opinion), then it's a good idea to let it acclimate to your workshop for a couple of weeks. (woodandshop.com)
External Links
How To
How to make wood joints
This tutorial will show you how to join two pieces of wood together. We will be using the "pocket-hole joint", which involves drilling holes in wood and then gluing them together. This works well if the wood is straight and smooth. You might consider dowel joinery if your wood isn’t straight or flat. These are the steps
-
Drill Pocket Hole Joints. You will need to measure and mark the exact location of your pocket hole joint. Next, drill 3/4 inch holes in each end of each piece using a handheld drilling machine or jigsaw.
-
Sand Smooth. You can sand the edges of the wood to ensure that it doesn't split.
-
Glue the two sides of the wood together. Apply glue to both ends of the wood. Allow it to cool for at least 5 minutes before you attach the pieces.
-
Clamp the Pieces Together. After the glue has dried completely, you can clamp the pieces together until they are flush.
-
Trim Joinery. Trimming the joinery after glue has completely dried.
You should leave enough space between the pieces to allow you to turn them inside-out.